...
Importers, Exporters, and Extract Facilities that use one or more flow meters should proceed to the section titled "Supplier “Supplier Type B: Importers, Exporters, and Extract Facilities That Use Flow Meters With No System Aggregation" Aggregation” and may disregard all other sections.
Capture and Extract Facilities with one or more streams that deliver CO2 to containers should proceed to the section titled "Supplier “Supplier Type C: Capture and Extract Facilities With Streams That Deliver CO2 to Containers" Containers” and may disregard all other sections.
Importers and Exporters that use containers should proceed to the section titled "Supplier “Supplier Type D: Importers and Exporters That Use Containers" Containers” and may disregard all other sections.
...
Step A1: Flow Meter Information
| Wiki Markup |
|---|
{composition-setup}{composition-setup} |
Click image to expand 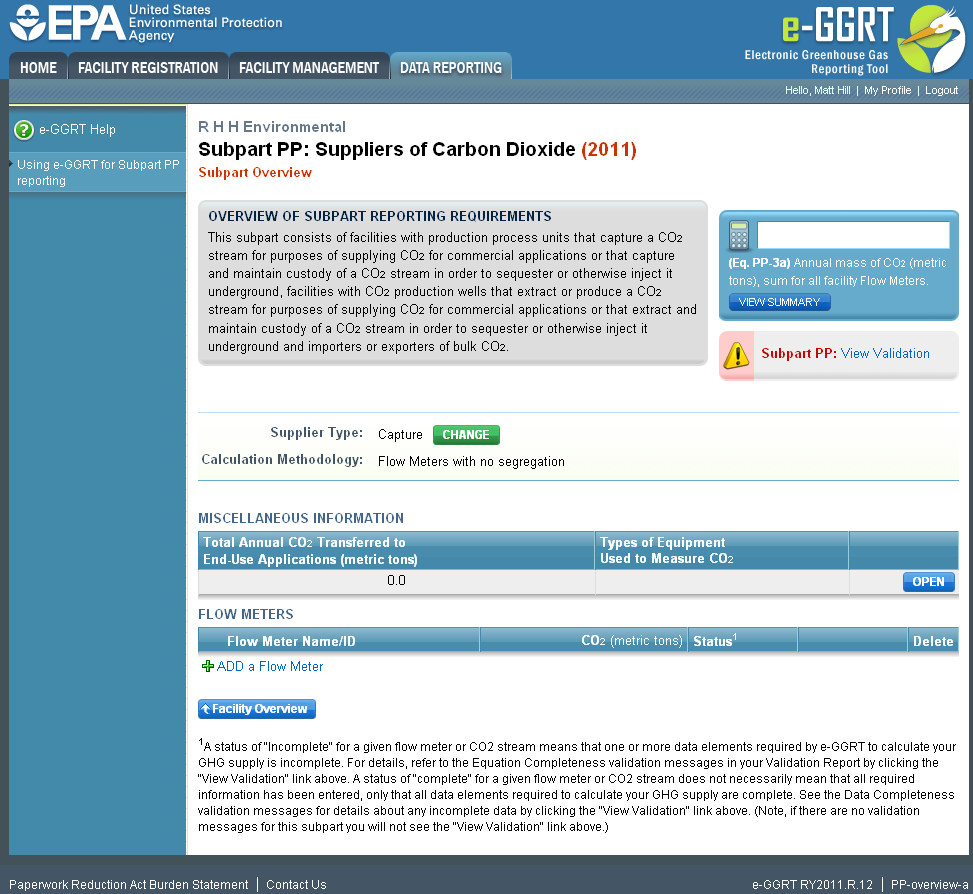
| Wiki Markup |
|---|
{cloak |
:id=PNG1|cloak.toggle. | zonetrue |
| id | PNG1 |
|---|
type=none|cloak.toggle. | typenone | zone=true} |
| Panel |
|---|
Image Added |
To add a To add a flow meter, click the link labeled "ADD “ADD a Flow Meter" Meter” located below the FLOW METERS table.
Click image to expand 
| Wiki Markup |
|---|
| Cloak |
|---|
{cloak:id=PNG2|cloak.toggle.type=none|cloak.toggle.zone=true} | true
| Panel |
|---|
Image Added |
| Wiki Markup |
|---|
{cloak} |
| id | PNG2 |
|---|
cloak.toggle.type | none |
The following information is required for each individual flow meter on this screen:
...
Use the text boxes and radio buttons to enter all required information for each flow meter.
If you have "other “other processing equipment," ” describe it in the text box. If you have more than one type of "other “other processing equipment," ” describe each type in the text box, including whether it is upstream or downstream of the flow meter.
...
When finished, click SAVE. You will be returned to the OVERVIEW screen, which will display the flow meter information you just saved.
Click image to expand | Wiki Markup |
|---|
{cloak:id=PNG3|cloak.toggle.type=none| |
| Cloak |
|---|
cloak.toggle.zone=true} | true
| Panel |
|---|
| id | PNG3 |
|---|
| cloak.toggle.type | none |
|---|
Image Added |
Repeat this step until you have added all flow meters. Once all flow meters used at your facility have been added to the table, click OPEN to enter measurement data for each flow meter.
...
Step A2.1: Equation PP-1 (mass-based measurements)
Click image to expand 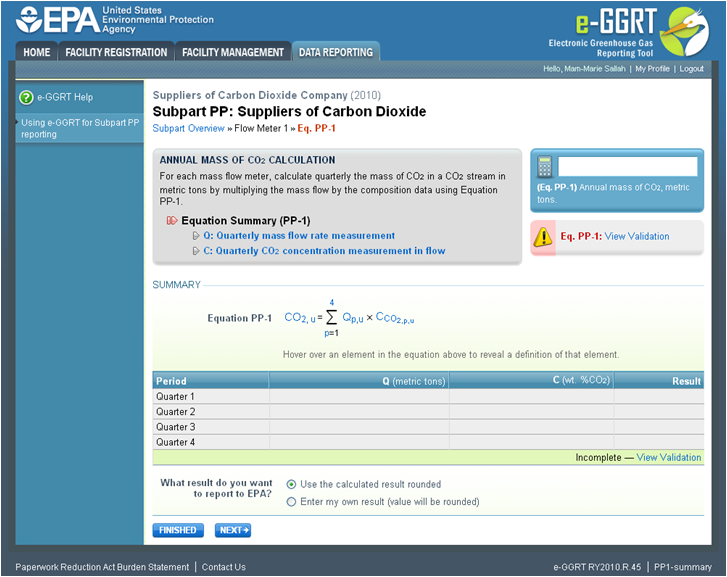
| Wiki Markup |
|---|
{cloak:id=PNG4|cloak |
| Cloak |
|---|
cloak.toggle.type=none|cloak.toggle.zone=true} | true
| Panel |
|---|
Image Added |
| Wiki Markup |
|---|
{cloak} |
| id | PNG4 |
|---|
cloak.toggle.type | none |
This page will be blank until you enter more data in subsequent screens. Use the radio buttons to select whether you would like to report results calculated by e-GGRT or enter your own results. If you choose to enter your own results, enter the value in the text box that is displayed below the radio buttons.
When finished, click NEXT.
Click image to expand 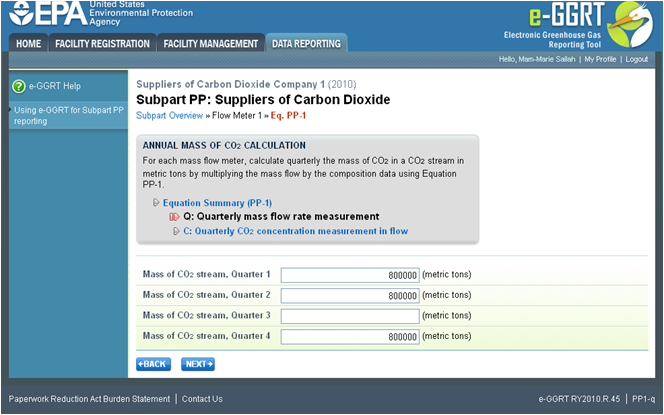
| Wiki Markup |
|---|
{cloak:id=PNG5| |
| Cloak |
|---|
|
| cloak.toggle.zone | true |
|---|
| id | PNG5 |
|---|
cloak.toggle.type | none | =none|cloak.toggle.zone=true} |
| Panel |
|---|
Image Added |
Use the Use the text boxes to enter the mass of the CO2 stream (in metric tons) for this flow meter in each quarter of the reporting year.
When finished, click NEXT.
Click image to expand 
| Wiki Markup |
|---|
| Cloak |
|---|
{cloak:id=PNG6|cloak.toggle.type=none|cloak.toggle.zone=true} | true
| Panel |
|---|
| id | PNG6 |
|---|
| cloak.toggle.type | none |
|---|
Image Added |
Use the text boxes to enter the concentration of the CO2 stream (in weight percent CO2) for this flow meter in each quarter of the reporting year and the name of the standard used to measure CO2 concentration. Express the concentration as a decimal fraction (e.g., enter 0.9 for a concentration of 90 percent). If you used more than one standard during the reporting year, enter them all.
When finished, click SUMMARY.
}
Click image to expand | Wiki Markup |
|---|
{cloak:id=PNG7|cloak.toggle.type=none| |
| Cloak |
|---|
cloak.toggle.zone=true} | true
| Panel |
|---|
Image Added |
| Wiki Markup |
|---|
{cloak} |
| id | PNG7 |
|---|
cloak.toggle.type | none |
To view the validation page for Equation PP-1, click the link labeled "View “View Validation."”
Once all data has been entered for this flow meter, click FINISHED.
Step A2.2: Equation PP-2 (volume-based measurements)
Click image to expand 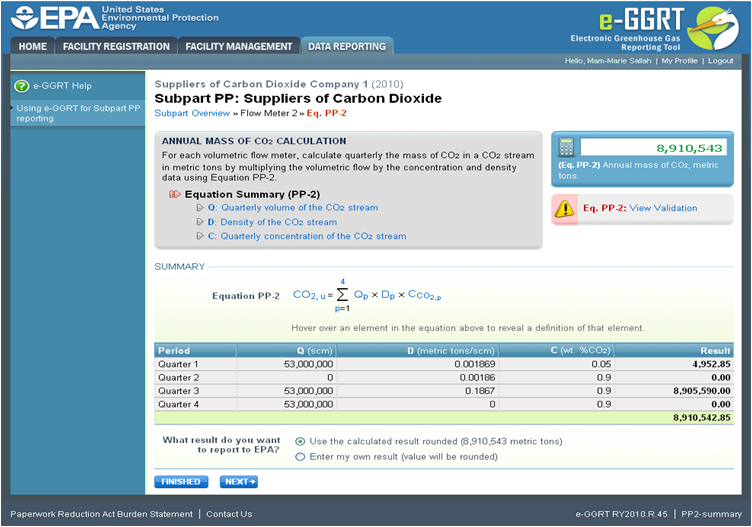
| Wiki Markup |
|---|
{cloak:id=PNG8|cloak.toggle.type=none| |
| Cloak |
|---|
cloak.toggle.zone=true} | true
| Panel |
|---|
Image Added |
| Wiki Markup |
|---|
{cloak} |
| id | PNG8 |
|---|
cloak.toggle.type | none |
Use the radio buttons to select whether you would like to report results calculated by e-GGRT or enter your own results. If you choose to enter your own results, enter the value in the text box that is displayed below the radio buttons.
When finished, click NEXT.
Click image to expand 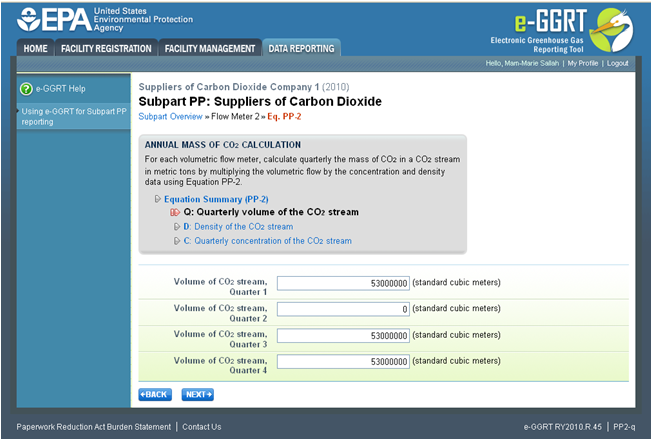
| Wiki Markup |
|---|
{cloak:id=PNG9| |
| Cloak |
|---|
|
| cloak.toggle.zone | true |
|---|
| id | PNG9 |
|---|
cloak.toggle.type | none | =none|cloak.toggle.zone=true} |
| Panel |
|---|
Image Added |
Use Use the text boxes to enter the volume of the CO2 stream (in standard cubic meters) for this flow meter in each quarter of the reporting year.
When finished, click NEXT.
Click image to expand 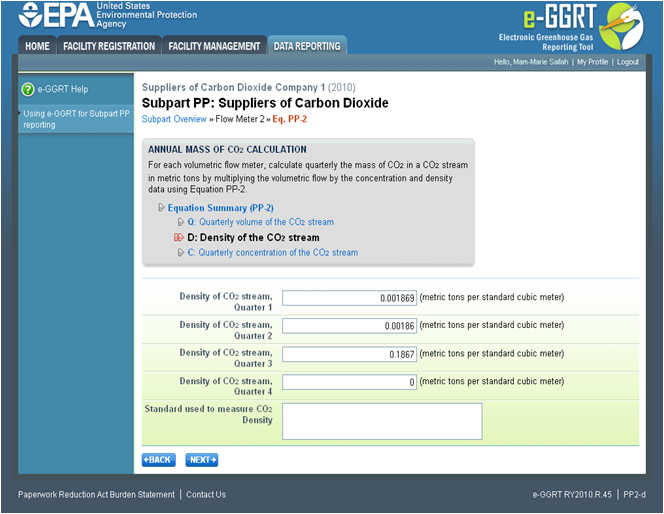
| Wiki Markup |
|---|
{cloak:id=PNG10|cloak.toggle.type=none| |
| Cloak |
|---|
cloak.toggle.zone=true} | true
| Panel |
|---|
| id | PNG10 |
|---|
| cloak.toggle.type | none |
|---|
Image Added |
This screen is for the density (metric tons per standard cubic meter) for this flow meter in each quarter of the reporting year.
If you selected the flow meter measurement type as "concentration “concentration in weight percentage" percentage” on the Add/Edit Flow Meter page, blank text boxes will be displayed, and you should enter the density of the CO2 stream and the name of the standard used to measure CO2 stream density. If you used more than one standard during the reporting year, enter them all.
If you selected the flow meter measurement type as "concentration “concentration in volume percentage" percentage” on the Add/Edit Flow Meter page, populated text boxes will be displayed with the density of CO2 that is required in the rule (0.001868 metric tons per standard cubic meter). A text box for the standard used to measure CO2 density will not be displayed.
When finished, click NEXT.
Click image to expand 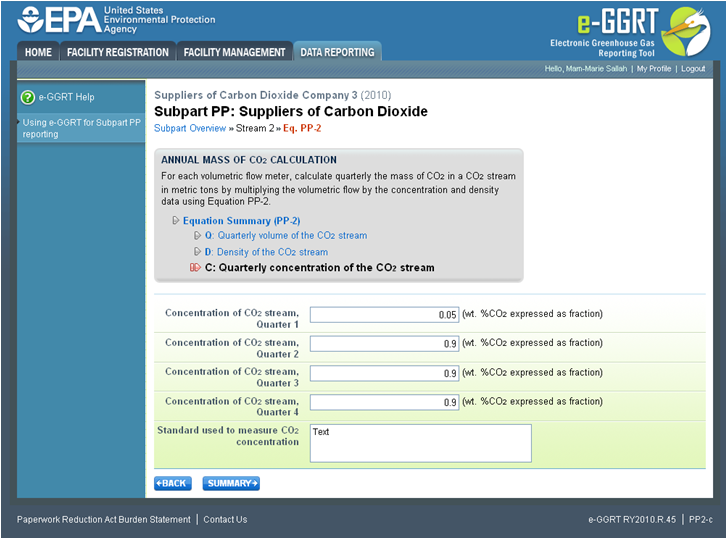
| Wiki Markup |
|---|
{cloak:id=PNG11|cloak.toggle.type=none| |
| Cloak |
|---|
cloak.toggle.zone=true} | true
| Panel |
|---|
| id | PNG11 |
|---|
| cloak.toggle.type | none |
|---|
Image Added |
Use the text boxes to enter the concentration of the CO2 stream (in weight percent CO2 or volume percent CO2 depending on the flow meter measurement type selected on the Add/Edit Flow Meter page) for this flow meter in each quarter of the reporting year and the name of the standard used to measure CO2 concentration. Express the concentration as a decimal fraction (e.g., enter 0.9 for a concentration of 90 percent). If you used more than one standard during the reporting year, enter them all.
When finished, click NEXT.
Click image to expand | Wiki Markup |
|---|
{cloak:id=PNG12|cloak.toggle.type=none|cloak |
| Cloak |
|---|
cloak.toggle.zone=true} | true
| Panel |
|---|
| id | PNG12 |
|---|
| cloak.toggle.type | none |
|---|
Image Added |
To view the validation page for Equation PP-2, click the link labeled "View “View Validation."”
Once all data has been entered for this flow meter, click FINISHED.
Step A3.1: Equation PP-3a (aggregation for flow meters with no segregation)
Click image to expand 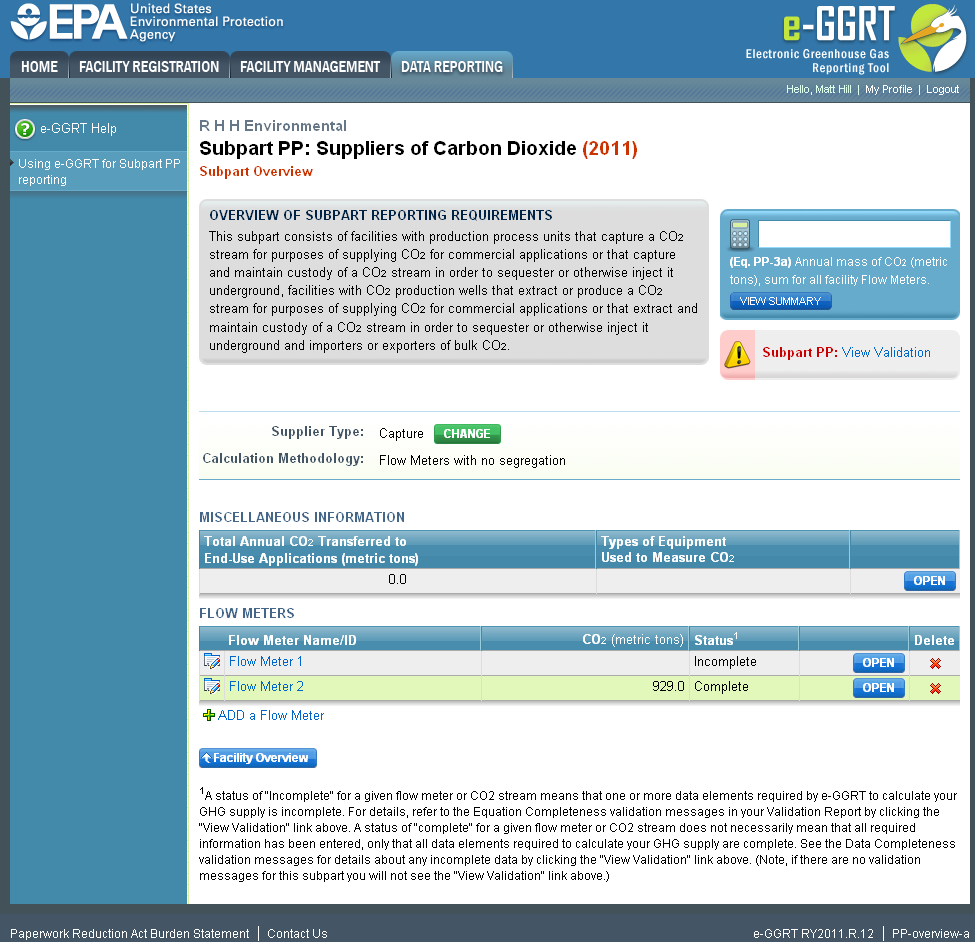
| Wiki Markup |
|---|
{cloak:id=PNG13| |
| Cloak |
|---|
|
| cloak.toggle.zone | true |
|---|
| id | PNG13 |
|---|
cloak.toggle.type | none | =none|cloak.toggle.zone=true} |
| Panel |
|---|
Image Added |
To view To view the results of Equation 3a, on the Subpart Overview page click VIEW SUMMARY.
Click image to expand 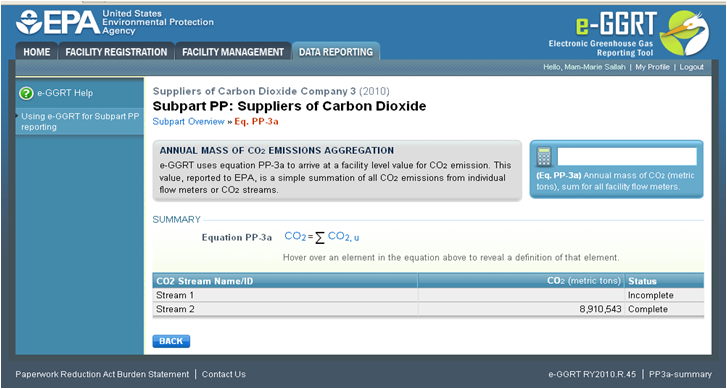
| Wiki Markup |
|---|
| Cloak |
|---|
{cloak:id=PNG14|cloak.toggle.type=none|cloak.toggle.zone=true} | true
| Panel |
|---|
Image Added |
| Wiki Markup |
|---|
{cloak} |
| id | PNG14 |
|---|
cloak.toggle.type | none |
To return to the Subpart Overview page once you have reviewed the facility-level data, click BACK.
Step A3.2: Equation PP-3b (aggregation for flow meters with segregation)
| Wiki Markup |
|---|
{toggle-cloak:id=PNG15} |
| Toggle Cloak |
|---|
id | PNG15Click image to expand 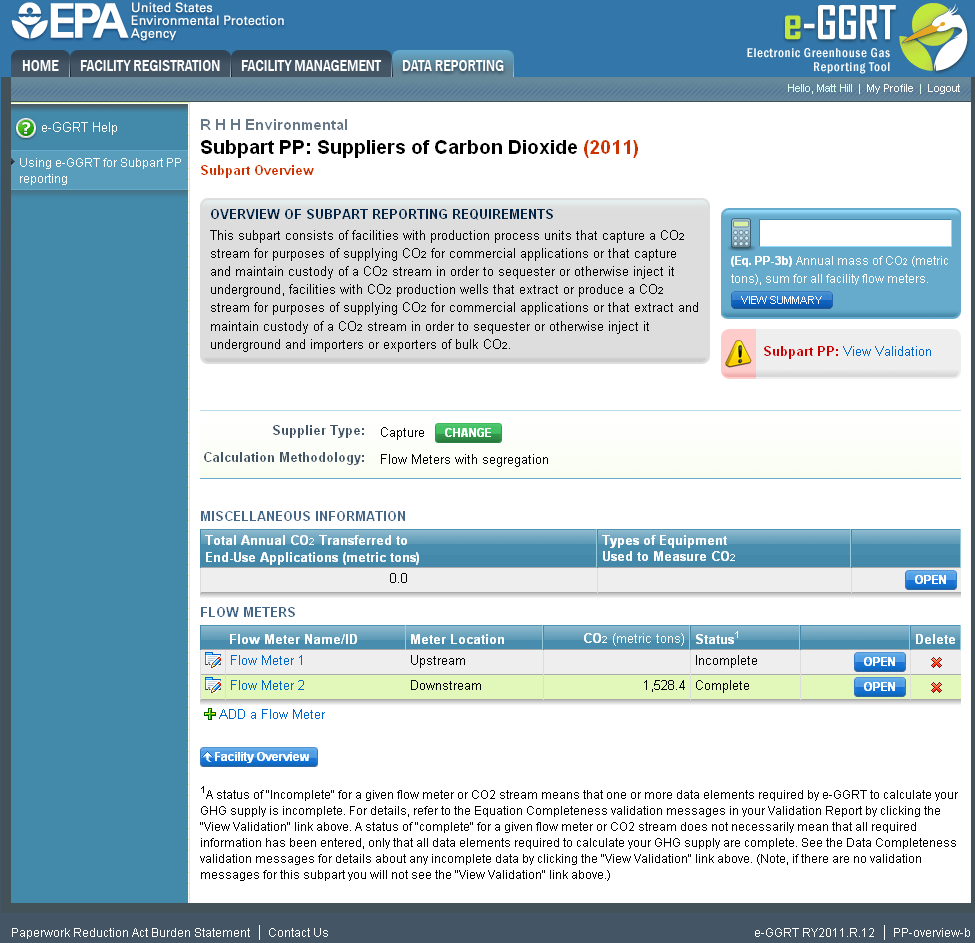
| Wiki Markup |
|---|
{cloak:id=PNG15|cloak.toggle.type=none| |
| Cloak |
|---|
cloak.toggle.zone=true} | true
| Panel |
|---|
Image Added |
| Wiki Markup |
|---|
{cloak} |
| id | PNG15 |
|---|
cloak.toggle.type | none |
To view the results of Equation 3b, on the Subpart Overview page click VIEW SUMMARY.
Click image to expand 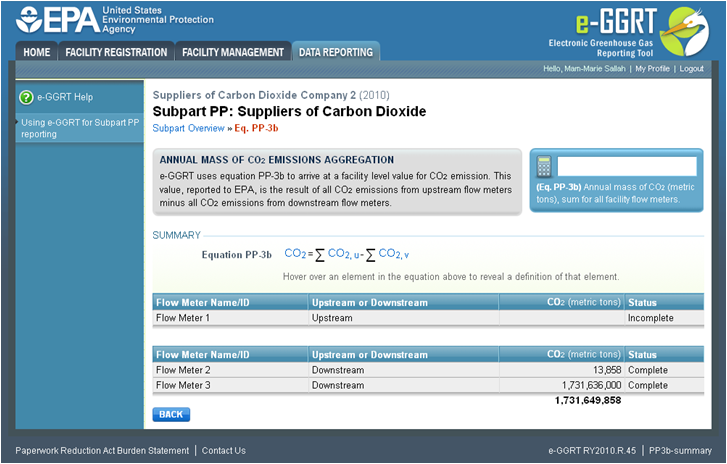
...
| cloak.toggle.zone | true |
|---|
| id | PNG16 |
|---|
| cloak.toggle.type | none |
|---|
| Wiki Markup |
|---|
{cloak:id=PNG16|cloak.toggle.type=none|cloak.toggle.zone=true} |
| Panel |
|---|
Image Added |
To return to the Subpart Overview page once you have reviewed the facility-level data, click BACK.
...
Step B1: Flow Meter Information
Click image to expand 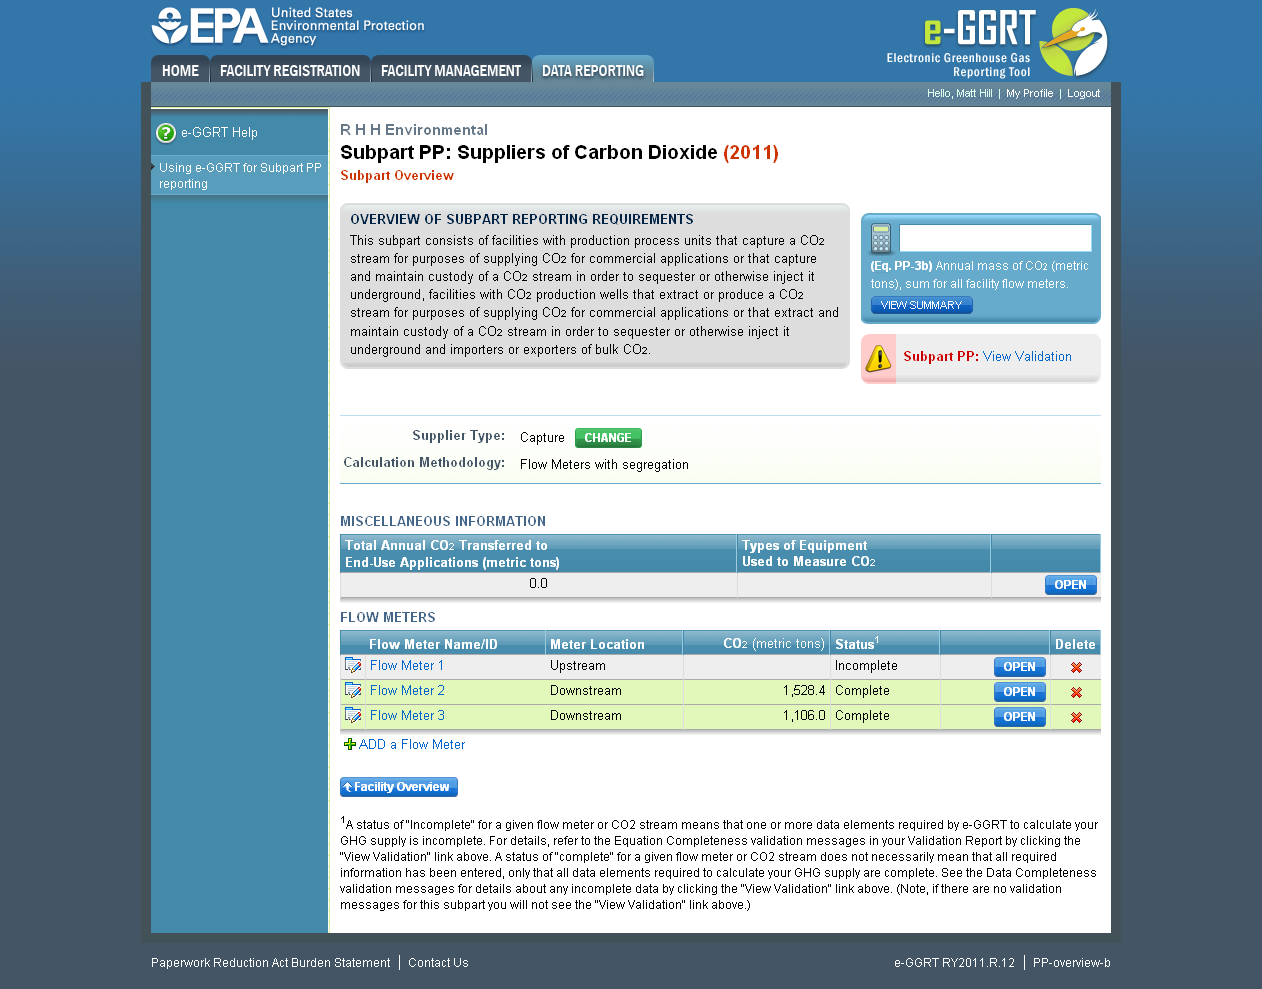
| Wiki Markup |
|---|
{cloak:id=PNG17|cloak.toggle.type=none| |
| Cloak |
|---|
cloak.toggle.zone=true} | true
| Panel |
|---|
Image Added |
| Wiki Markup |
|---|
{cloak} |
| id | PNG17 |
|---|
cloak.toggle.type | none |
To add a flow meter, click the link labeled "ADD “ADD a Flow Meter" Meter” located below the FLOW METERS table on the Subpart Overview page.
| Wiki Markup |
|---|
{toggle-cloak:id=PNG18} |
Click image to expand 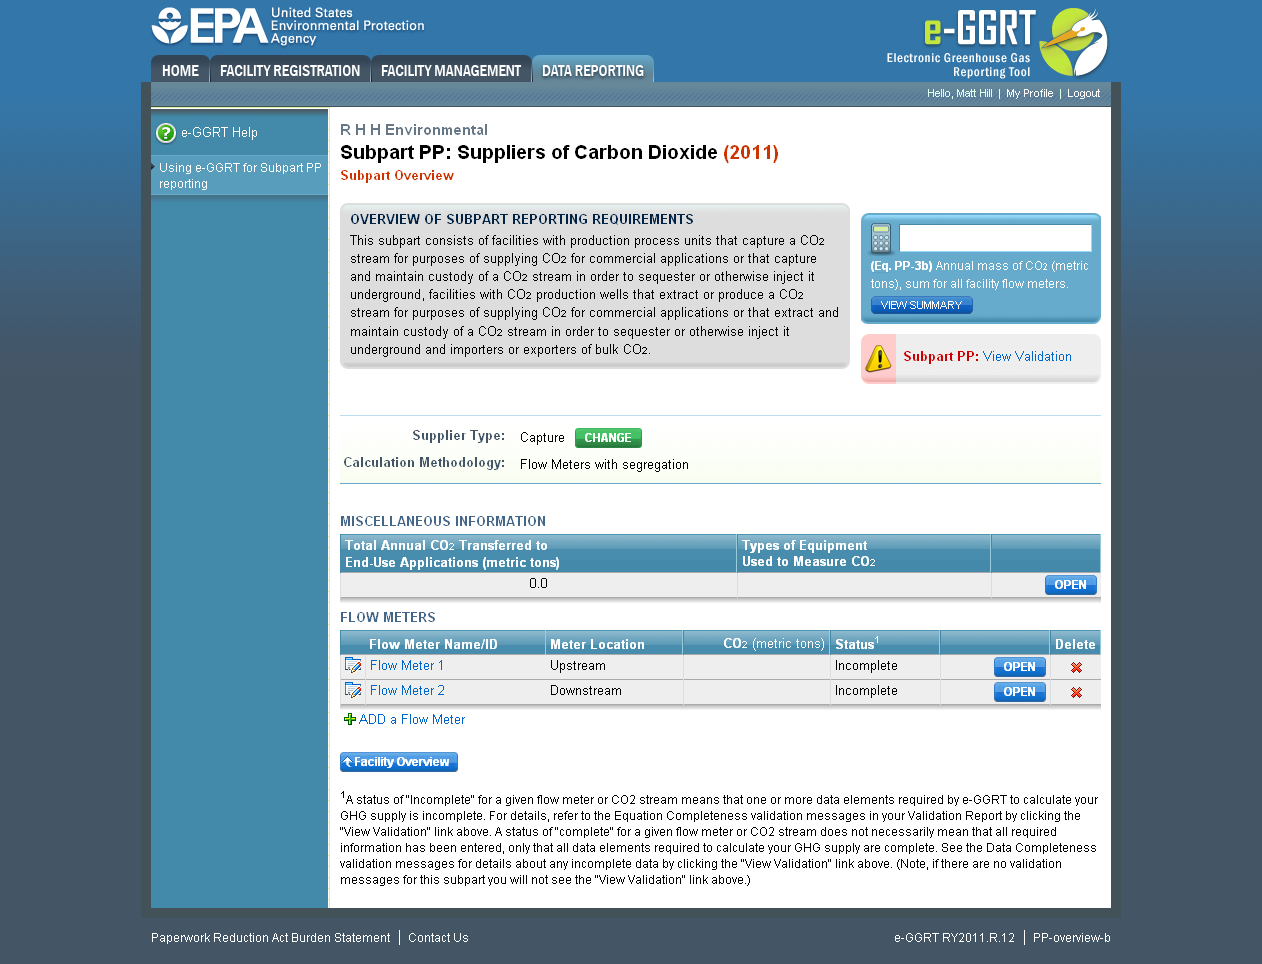 Image Added
...
...
| inline-wiki-markup |
|---|
{cloak:id=PNG18|cloak.toggle.type=none| |
| Cloak |
|---|
cloak.toggle.zone=true} | true
| Panel |
|---|
Image Added |
| Wiki Markup |
|---|
{cloak} |
| id | PNG18 |
|---|
cloak.toggle.type | none |
The following information is required for each individual flow meter on this screen:
...
Use the text boxes and radio buttons to enter all required information for each flow meter.
If you have "other “other process equipment"equipment”, describe it in the text box. If you have more than one type of "other “other processing equipment," ” describe each type in the text box, including whether it is upstream or downstream of the flow meter.
...
When finished, click SAVE. You will be returned to the OVERVIEW screen, which will display the flow meter information you just saved.
| Wiki Markup |
|---|
{toggle-cloak:id=PNG19} |
|
Click image to expand Image RemovedClick image to expand Image Added| Wiki Markup |
|---|
{cloak:id=PNG19|cloak.toggle.type=none| |
| Cloak |
|---|
cloak.toggle.zone=true} | true
| Panel |
|---|
| id | PNG19 |
|---|
| cloak.toggle.type | none |
|---|
Image Added |
Repeat this step until you have added all flow meters. Once all flow meters used at your facility have been added to the table, click OPEN to enter measurement data for each flow meter.
...
Step B2.1: Equation PP-1 (mass-based measurements)
Click image to expand | Wiki Markup |
|---|
{cloak:id=PNG20|cloak.toggle.type=none| |
| Cloak |
|---|
cloak.toggle.zone=true} | true
| Panel |
|---|
Image Added |
| Wiki Markup |
|---|
{cloak} |
| id | PNG20 |
|---|
cloak.toggle.type | none |
This page will be blank until you enter more data in subsequent screens. Use the radio buttons to select whether you would like to report results calculated by e-GGRT or enter your own results. If you choose to enter your own results, enter the value in the text box that is displayed below the radio buttons.
When finished, click NEXT.
Click image to expand | Wiki Markup |
|---|
{cloak:id=PNG21|cloak.toggle.type=none| |
| Cloak |
|---|
cloak.toggle.zone=true} | true
| Panel |
|---|
| id | PNG21 |
|---|
| cloak.toggle.type | none |
|---|
Image Added |
Use the text boxes to enter the mass of the CO2 stream (in metric tons) for this flow meter in each quarter of the reporting year.
When finished, click NEXT.
Click image to expand | Wiki Markup |
|---|
| Cloak |
|---|
{cloak:id=PNG22|cloak.toggle.type=none|cloak.toggle.zone=true} | true
| Panel |
|---|
| id | PNG22 |
|---|
| cloak.toggle.type | none |
|---|
Image Added |
Use the text boxes to enter the concentration of the CO2 stream (in weight percent CO2) for this flow meter in each quarter of the reporting year and the name of the standard used to measure CO2 concentration. Express the concentration as a decimal fraction (e.g., enter 0.9 for a concentration of 90 percent). If you used more than one standard during the reporting year, enter them all.
When finished, click SUMMARY.
Click image to expand | Wiki Markup |
|---|
{cloak:id=PNG23|cloak.toggle.type=none| |
| Cloak |
|---|
cloak.toggle.zone=true} | true
| Panel |
|---|
| id | PNG23 |
|---|
| cloak.toggle.type | none |
|---|
Image Added |
To view the validation page for Equation PP-1, click the link labeled "View “View Validation."”
Once all data has been entered for this flow meter, click FINISHED.
Step B2.2: Equation PP-2 (volume-based measurements)
Click image to expand | Wiki Markup |
|---|
{cloak:id=PNG24|cloak.toggle.type=none| |
| Cloak |
|---|
cloak.toggle.zone=true} | true
| Panel |
|---|
Image Added |
| Wiki Markup |
|---|
{cloak} |
| id | PNG24 |
|---|
cloak.toggle.type | none |
Use the radio buttons to select whether you would like to report results calculated by e-GGRT or enter your own results. If you choose to enter your own results, enter the value in the text box that is displayed below the radio buttons.
When finished, click NEXT.
Click image to expand | Wiki Markup |
|---|
{cloak:id=PNG25|cloak.toggle.type=none| |
| Cloak |
|---|
cloak.toggle.zone=true} | true
| Panel |
|---|
| id | PNG25 |
|---|
| cloak.toggle.type | none |
|---|
Image Added |
Use the text boxes to enter the volume of the CO2 stream (in standard cubic meters) for this flow meter in each quarter of the reporting year.
When finished, click NEXT.
Click image to expand Image Removed Image Added| Wiki Markup |
|---|
{cloak:id=PNG26|cloak.toggle.type=none| |
| Cloak |
|---|
cloak.toggle.zone=true} | true
| Panel |
|---|
Image Added |
| Wiki Markup |
|---|
{cloak} |
| id | PNG26 |
|---|
cloak.toggle.type | none |
This screen is for the density (metric tons per standard cubic meter) for this flow meter in each quarter of the reporting year.
If you selected the flow meter measurement type as "concentration “concentration in weight percentage" percentage” on the Add/Edit Flow Meter page, blank text boxes will be displayed, and you should enter the density of the CO2 stream and the name of the standard used to measure CO2 stream density. If you use more than one standard during the reporting year, enter them all.
If you selected the flow meter measurement type as "concentration “concentration in volume percentage" percentage” on the Add/Edit Flow Meter page, populated text boxes will be displayed with the density of CO2 that is required in the rule (0.001868 metric tons per standard cubic meter). A text box for the standard used to measure CO2 density will not be displayed.
When finished, click NEXT.
Click image to expand | Wiki Markup |
|---|
{cloak:id=PNG27|cloak.toggle.type=none| |
| Cloak |
|---|
cloak.toggle.zone=true} | true
| Panel |
|---|
Image Added |
| Wiki Markup |
|---|
{cloak} |
| id | PNG27 |
|---|
cloak.toggle.type | none |
Use the text boxes to enter the concentration of the CO2 stream (in weight percent CO2 or volume percent CO2 depending on the flow meter measurement type selected on the Add/Edit Flow Meter page) for this flow meter in each quarter of the reporting year and the name of the standard used to measure CO2 concentration. Express the concentration as a decimal fraction (e.g., enter 0.9 for a concentration of 90 percent). If you used more than one standard during the reporting year, enter them all.
When finished, click NEXT.
Click image to expand | Wiki Markup |
|---|
| Cloak |
|---|
{cloak:id=PNG28|cloak.toggle.type=none|cloak.toggle.zone=true} | true
| Panel |
|---|
| id | PNG28 |
|---|
| cloak.toggle.type | none |
|---|
Image Added |
To view the validation page for Equation PP-2, click the link labeled "View “View Validation."”
Once all data has been entered for this flow meter, click FINISHED.
Click image to expand 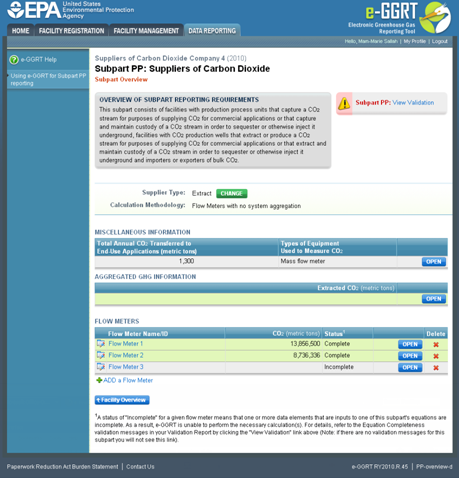
| Wiki Markup |
|---|
{cloak:id=PNG29|cloak.toggle.type=none| |
| Cloak |
|---|
cloak.toggle.zone=true} | true
| Panel |
|---|
| id | PNG29 |
|---|
| cloak.toggle.type | none |
|---|
Image Added |
To enter aggregated GHG information, find the AGGREGATED GHG INFORMATION table and click OPEN.
Click image to expand 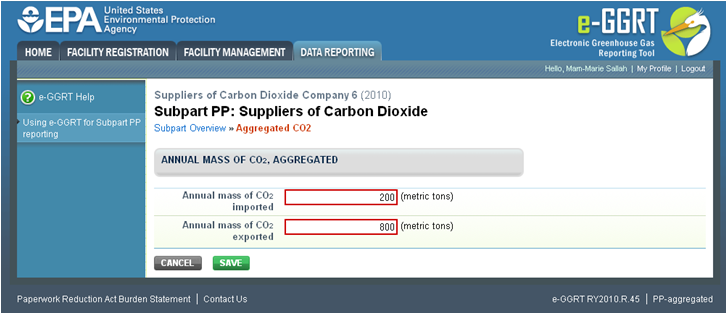
| Wiki Markup |
|---|
| Cloak |
|---|
{cloak:id=PNG30|cloak.toggle.type=none|cloak.toggle.zone=true} | true
| Panel |
|---|
Image Added |
| Wiki Markup |
|---|
{cloak} |
| id | PNG30 |
|---|
cloak.toggle.type | none |
Use the text box to enter the total annual mass of CO2 extracted (in metric tons) at your facility. Ensure that the value you enter here is equal to the sum of CO2 through all flow meters you use, as listed on the Subpart Overview page.
...
Step B3.2: Annual CO2 Imported and Exported
Click image to expand 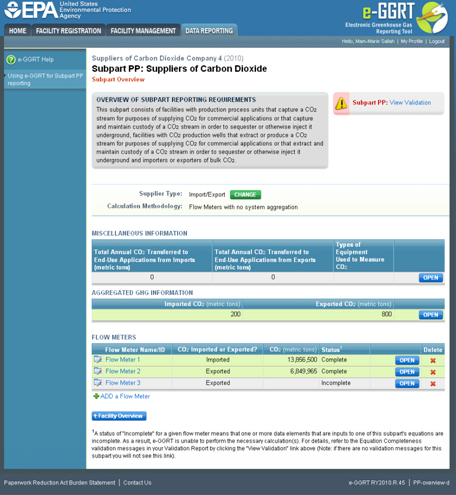
| Wiki Markup |
|---|
| Cloak |
|---|
{cloak:id=PNG31|cloak.toggle.type=none|cloak.toggle.zone | true |
| id | PNG31 |
|---|
cloak.toggle.type | none=true} |
| Panel |
|---|
Image Added |
To enter aggregated GHG information, find the AGGREGATED GHG INFORMATION table and click OPEN.
Click image to expand | Wiki Markup |
|---|
{cloak:id=PNG32|cloak.toggle.type=none| |
| Cloak |
|---|
cloak.toggle.zone=true} | true
| Panel |
|---|
| id | PNG32 |
|---|
| cloak.toggle.type | none |
|---|
Image Added |
Use the text boxes to enter the total annual mass of CO2 imported and exported (in metric tons) at the corporate level. Enter a value of "0" “0” for the total annual mass of CO2 imported if you exported only, and vice versa. Ensure that the value you enter here as imported is equal to the sum of CO2 through all import flow meters you use, as listed on the Subpart Overview page. Ensure the same for the exported value.
...
Each Step is described below.
Step C1: CO2 Stream Information Stream Information
Click image to expand 
| Wiki Markup |
|---|
| Cloak |
|---|
{cloak:id=PNG33|cloak.toggle.type=none|cloak.toggle.zone=true} | true
| Panel |
|---|
Image Added |
| Wiki Markup |
|---|
{cloak} |
| id | PNG33 |
|---|
cloak.toggle.type | none |
To add a CO2 stream supplied in containers, click the link labeled "ADD “ADD a CO2 Stream" Stream” located below the CO2 STREAMS table.
Click image to expand 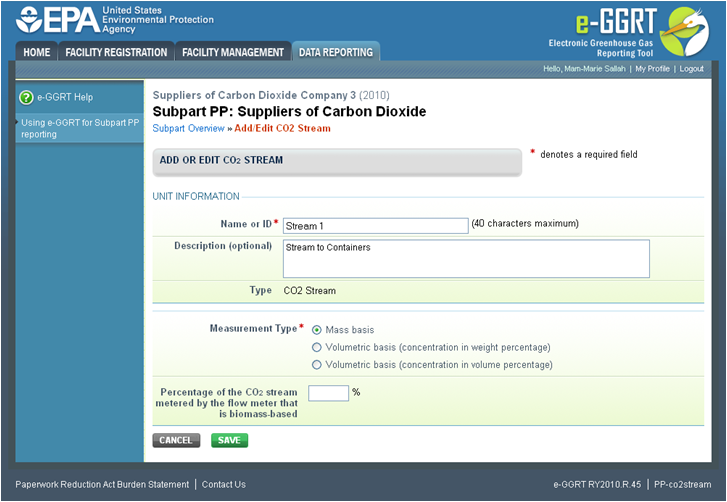 Image Removed Image Added
| Wiki Markup |
|---|
{cloak:id=PNG34|cloak.toggle.type=none| |
| Cloak |
|---|
cloak.toggle.zone=true} | true
| Panel |
|---|
Image Added |
| Wiki Markup |
|---|
{cloak} |
| id | PNG34 |
|---|
cloak.toggle.type | none |
The following information is required for each CO2 stream supplied in containers on this screen:
...
Use the text boxes and radio buttons to enter all required information for each CO2 stream.
If you don't don’t have all the data, you can enter some now, save it, then finish it later.
When finished, click SAVE. You will be returned to the OVERVIEW screen, which will display the flow meter information you just saved.
Click image to expand | Wiki Markup |
|---|
{cloak:id=PNG35|cloak.toggle.type=none| |
| Cloak |
|---|
cloak.toggle.zone=true} | true
| Panel |
|---|
| id | PNG35 |
|---|
| cloak.toggle.type | none |
|---|
Image Added |
Repeat this step until you have added all CO2 streams. Once all CO2 streams at your facility have been added to the table, click OPEN to enter measurement data for each CO2 stream.
...
Step C2.1: Equation PP-1 (mass-based measurements)
Click image to expand | Wiki Markup |
|---|
{cloak:id=PNG36|cloak.toggle.type=none| |
| Cloak |
|---|
cloak.toggle.zone=true} | true
| Panel |
|---|
| id | PNG36 |
|---|
| cloak.toggle.type | none |
|---|
Image Added |
This page will be blank until you enter more data in subsequent screen. Use the radio buttons to select whether you would like to report results calculated by e-GGRT or enter your own results. If you choose to enter your own results, enter the value in the text box that is displayed below the radio buttons.
When finished, click NEXT.NEXT.
Click image to expand | Wiki Markup |
|---|
| Cloak |
|---|
{cloak:id=PNG37|cloak.toggle.type=none|cloak.toggle.zone=true} | true
| Panel |
|---|
Image Added |
| Wiki Markup |
|---|
{cloak} |
| id | PNG37 |
|---|
cloak.toggle.type | none |
Use the text boxes to enter the mass of the CO2 stream (in metric tons) in each quarter of the reporting year.
When finished, click NEXT.
Click image to expand Image Removed Image Added| Wiki Markup |
|---|
{cloak:id=PNG38|cloak.toggle.type=none| |
| Cloak |
|---|
cloak.toggle.zone=true} | true
| Panel |
|---|
| id | PNG38 |
|---|
| cloak.toggle.type | none |
|---|
Image Added |
Use the text boxes to enter the concentration of the CO2 stream (in weight percent CO2) in each quarter of the reporting year and the name of the standard used to measure CO2 concentration. Express the concentration as a decimal fraction (e.g., enter 0.9 for a concentration of 90 percent). If you used more than one standard during the reporting year, enter them all.
When finished, click SUMMARY.
Click image to expand | Wiki Markup |
|---|
| Cloak |
|---|
{cloak:id=PNG139|cloak.toggle.type=none|cloak.toggle.zone | true |
| id | PNG139 |
|---|
cloak.toggle.type | none=true} |
| Panel |
|---|
Image Added |
To view the validation page for Equation PP-1, click the link labeled "View “View Validation."”
Once all data has been entered for this CO2 stream, click FINISHED.
Step C2.2: Equation PP-2 (volume-based measurements)
Click image to expand | Wiki Markup |
|---|
{cloak:id=PNG40|cloak.toggle.type=none| |
| Cloak |
|---|
cloak.toggle.zone=true} | true
| Panel |
|---|
| id | PNG40 |
|---|
| cloak.toggle.type | none |
|---|
Image Added |
Use the radio buttons to select whether you would like to report results calculated by e-GGRT or enter your own results. If you choose to enter your own results, enter the value in the text box that is displayed below the radio buttons.
When finished, click NEXT.NEXT.
Click image to expand | Wiki Markup |
|---|
| Cloak |
|---|
{cloak:id=PNG41|cloak.toggle.type=none|cloak.toggle.zone=true} | true
| Panel |
|---|
Image Added |
| Wiki Markup |
|---|
{cloak} |
| id | PNG41 |
|---|
cloak.toggle.type | none |
Use the text boxes to enter the volume of the CO2 stream (in standard cubic meters) in each quarter of the reporting year.
When finished, click NEXT.
cloak |
Click image to expand Image RemovedClick image to expand Image Added| Wiki Markup |
|---|
{cloak:id=PNG142|cloak.toggle.type=none| |
| Cloak |
|---|
cloak.toggle.zone=true} | true
| Panel |
|---|
Image Added |
| Wiki Markup |
|---|
{cloak} |
| id | PNG142 |
|---|
cloak.toggle.type | none |
This screen is for the density (metric tons per standard cubic meter) for this CO2 stream supplied in containers in each quarter of the reporting year.
If you selected the CO2 stream measurement type as "concentration “concentration in weight percentage" percentage” on the Add/Edit CO2 stream page, blank text boxes will be displayed, and you should enter the density of the CO2 stream and the name of the standard used to measure CO2 stream density. If you use more than one standard during the reporting year, enter them all.
If you selected the flow meter measurement type as "concentration “concentration in volume percentage" percentage” on the Add/Edit CO2 stream page, populated text boxes will be displayed with the density of CO2 that is required in the rule (0.001868 metric tons per standard cubic meter). A text box for the standard used to measure CO2 density will not be displayed.
When finished, click NEXT.
Click image to expand Image Removed Image Added| Wiki Markup |
|---|
{cloak:id=PNG43|cloak.toggle.type=none| |
| Cloak |
|---|
cloak.toggle.zone=true} | true
| Panel |
|---|
| id | PNG43 |
|---|
| cloak.toggle.type | none |
|---|
Image Added |
Use the text boxes to enter the concentration of the CO2 stream (in weight percent CO2 or volume percent CO2 depending on the CO2 stream measurement type selected on the Add/Edit CO2 Stream page) in each quarter of the reporting year and the name of the standard used to measure CO2 concentration. Express the concentration as a decimal fraction (e.g., enter 0.9 for a concentration of 90 percent). If you used more than one standard during the reporting year, enter them all.
When finished, click NEXT.
Click image to expand | Wiki Markup |
|---|
| Cloak |
|---|
{cloak:id=PNG44|cloak.toggle.type=none|cloak.toggle.zone=true} | true
| Panel |
|---|
| id | PNG44 |
|---|
| cloak.toggle.type | none |
|---|
Image Added |
To view the validation page for Equation PP-2, click the link labeled "View “View Validation."”
Once all data has been entered for this CO2 stream, click FINISHED.
Step C3: Equation PP-3a (aggregation of CO2 streams)
Click image to expand 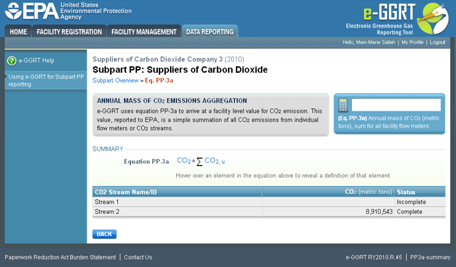
| Wiki Markup |
|---|
{cloak:id=PNG144|cloak.toggle.type=none| |
| Cloak |
|---|
cloak.toggle.zone=true} | true
| Panel |
|---|
| id | PNG144 |
|---|
| cloak.toggle.type | none |
|---|
Image Added |
To view the results of Equation 3a, on the Subpart Overview page click VIEW SUMMARY.
Click image to expand | Wiki Markup |
|---|
{cloak:id=PNG46|cloak.toggle.type=none| |
| Cloak |
|---|
cloak.toggle.zone=true} | true
| Panel |
|---|
Image Added |
| Wiki Markup |
|---|
{cloak} |
| id | PNG46 |
|---|
cloak.toggle.type | none |
To return to the Subpart Overview page once you have reviewed the facility-level data, click BACK.
| h3.anchor |
|---|
Supplier Type D: Importers and Exporters That Use Containers |
Click image to expand 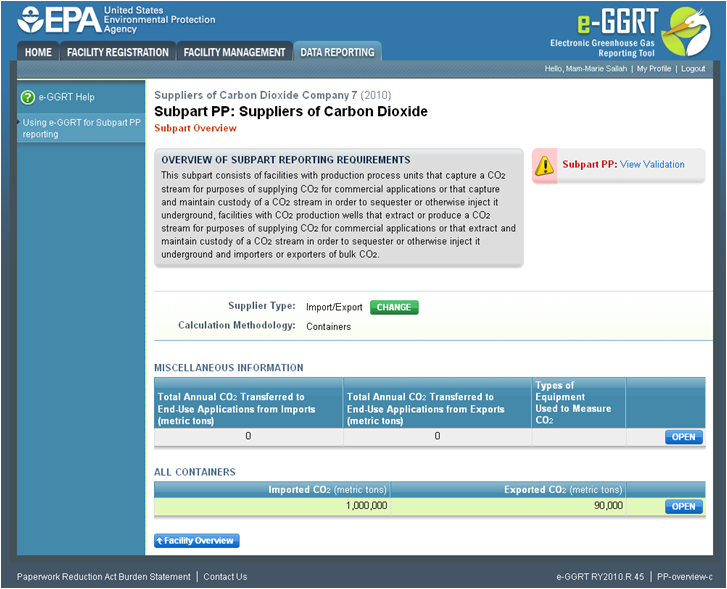
| Wiki Markup |
|---|
{cloak:id=PNG47|cloak.toggle.type=none| |
| Cloak |
|---|
cloak.toggle.zone=true} | true
| Panel |
|---|
| id | PNG47 |
|---|
| cloak.toggle.type | none |
|---|
Image Added |
Subpart PP requires importers and exporters that supply CO2 in containers to report the following information at the corporate level:
...
To enter CO2 import and export data, click OPEN in the ALL CONTAINERS table on the Subpart Overview page.
Click image to expand 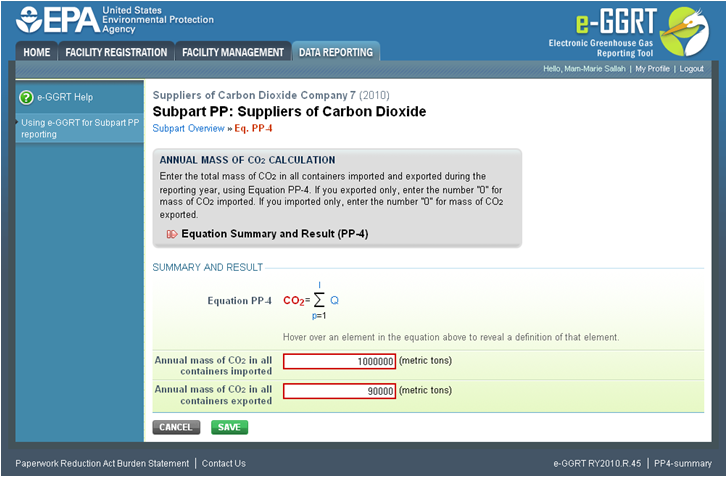
| Wiki Markup |
|---|
| Cloak |
|---|
{cloak:id=PNG48|cloak.toggle.type=none|cloak.toggle.zone=true} | true
| Panel |
|---|
Image Added |
| Wiki Markup |
|---|
{cloak} |
| id | PNG48 |
|---|
cloak.toggle.type | none |
Use the text boxes to enter the total annual mass of CO2 imported and exported (in metric tons) at the corporate level. Enter a value of "0" “0” for the total annual mass of CO2 imported if you exported only, and vice versa.
...